
Independent · No paywall · We track down the answers SAT, 05 SEPT 2026
The Hunters
Sections
Home & Garden

Urban rooftop gardening: plan a safe edible roof

A roof can grow far more than a few basil pots-but only when its structure, surface, and access are treated as part of the garden plan.

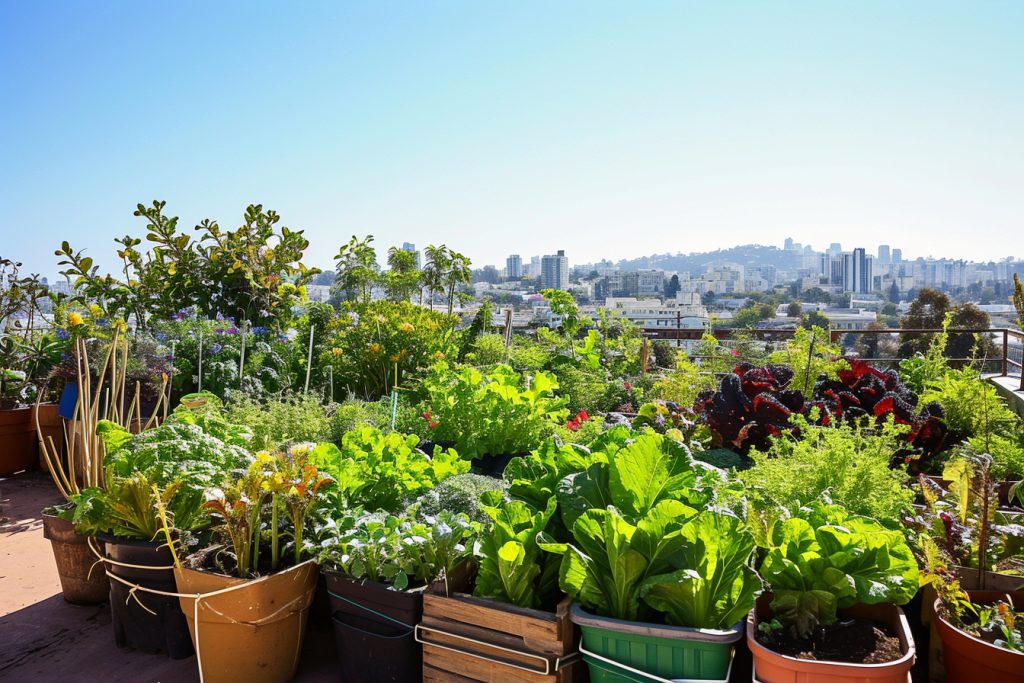
Raised planters with herbs and vegetables on a city apartment rooftop, with skyline buildings behind
A small container garden can thrive above the street when the roof comes first.

The short answer

How do I start an urban rooftop garden safely?

Start with the building, not the plants. Get written permission from the owner or association, confirm the roof’s allowed load with a qualified building professional, and make sure access, drainage, waterproofing, and fire routes remain protected. Then use lightweight, movable containers, secure them against wind, and begin with a small group of sun-matched crops. A healthy roof garden is one the building can safely carry and maintain.

What we found

  • Written approval and a roof-specific load assessment come before soil, furniture, or planters; a roof’s safe capacity cannot be guessed from its appearance.
  • Wet growing medium, large containers, people, snow, and stored supplies all count toward the load, often concentrated in small areas rather than spread evenly.
  • Never pierce, drag across, or bury a roof membrane. Containers need protective feet or pads, clear drainage routes, and inspection space around them.
  • Wind and reflected heat make rooftops harsher than ground-level gardens. Low, broad containers and sturdy crops usually outperform tall, delicate plants.
  • A small first-season garden of herbs, greens, and compact fruiting plants teaches the roof’s light, wind, and watering pattern without creating an unmanageable project.

The tempting version of rooftop gardening begins with a bright row of tomatoes against the skyline. The practical version begins with a question nobody can answer from a street-level photograph: what, exactly, is this roof designed to hold? A roof is a building system, not an empty patio. Its structure carries permanent materials, weather loads, maintenance workers, and sometimes mechanical equipment. Adding wet containers, people, trellises, storage, and a garden gathering can change both the amount and the distribution of that load.

That does not make a food garden out of reach for apartment dwellers, co-op residents, or owners of small flat-roof buildings. It means the most successful roof gardens are designed in the right order. Approval, structural capacity, access, waterproofing, drainage, wind, and a maintenance plan come first. The enjoyable choices-what to grow, which pots look good, where to put a chair-come afterward. This sequence also protects the people below the roof, whose ceiling should never become the evidence of an enthusiastic gardening experiment.

A modest setup can still be remarkably useful: a few troughs of salad greens, herbs close to the door, compact peppers, and flowers for visiting insects. It can also be easier to care for than an ambitious plot once summer heat arrives, provided water is available nearby. The goal is not to cover every square foot with soil. It is to make a roof garden that can be checked after rain, watered on a hot evening, cleared before a storm, and removed or repaired without damaging the building.

Get permission and roof facts before buying a single planter #

Begin with the person or entity responsible for the building: a landlord, property manager, condominium or co-op board, homeowner association, or, for an owned building, the relevant local building department. Ask for permission in writing. A lease may allow “balcony plants” while saying nothing about the roof; that is not permission to use the roof. Shared roofs also raise questions about liability, keys, noise, hours, storage, and who pays if a drain is blocked or a membrane is damaged.

Ask for the roof plan, the age and type of roofing system, the location of drains and mechanical equipment, and any existing rules for roof access. A recently installed membrane may have warranty conditions that prohibit particular pads, adhesives, furniture feet, or traffic patterns. A roof that looks flat is deliberately pitched very slightly toward drains; covering that subtle fall with platforms or trapped debris can create standing water. If the building has a facilities manager or roofing contractor, include them early rather than presenting a finished garden as a surprise.

QuestionWhy it mattersUseful answer
Who can authorize roof use?Rules differ for tenants, owners, and shared buildings.A named person and written approval.
What is the allowed roof load?Capacity depends on the specific structure and location.A structural professional’s guidance for proposed loads.
What roofing system is installed?Membranes have different protection and warranty requirements.Material, age, warranty terms, and contractor contact.
Where are drains and service routes?They must remain reachable in every season.A plan showing drains, hatches, units, and walkways.
Are permits or insurance required?Local rules may apply to railings, structures, water, or public access.Requirements confirmed before installation.
Questions to settle with the building team

Make access and emergency routes part of the layout #

A garden is only as manageable as the route to it. Trace the trip a bag of growing medium, a full watering can, a pot, and a harvest basket will take from street to roof. Does the elevator permit freight? Are there narrow stairs, a locked hatch, a ladder, or a door that swings into the usable space? Carrying a heavy container up multiple flights is not a clever workaround; it is a reason to use smaller containers, bring medium up dry in manageable bags, or choose a different site.

Keep roof hatches, doors, stairs, ladders, fire escapes, mechanical units, electrical panels, and any required service paths clear. Do not use a fire route as a potting bench or hide a drain beneath a decorative screen. If the roof edge has a parapet or guardrail, do not assume it is suitable for attaching planters, nets, lights, shade cloth, or trellises. Fastening anything to the building envelope or railing needs explicit approval; an unsecured object becoming airborne is a serious hazard.

  • Walk the route before shopping, measuring doorways, stair turns, hatch openings, and elevator dimensions.
  • Plan a firm, unobstructed route to every roof drain, inspection point, and mechanical unit.
  • Confirm where water comes from and where hoses may run; do not create a trip hazard across a shared route.
  • Keep a clear place to set down tools and harvested produce without blocking the only exit.
  • Decide who can reach the garden if the primary gardener is away during a heat wave or before a forecast storm.

Understand weight before choosing containers or soil depth #

The dangerous mistake is thinking only about a pot’s empty weight. Growing medium becomes much heavier when saturated, and a large planter can concentrate that weight over a small footprint. Add the container itself, a water reservoir, plants, trellis, mulch, a person leaning on the edge, and seasonal rain or snow. Rows of identical tubs may look evenly distributed while actually loading one narrow strip of roof. Never use online rules of thumb or a neighbor’s setup as proof that your roof can carry yours.

A qualified structural engineer or other building professional working from the building’s records can determine what is appropriate, including whether certain zones are stronger than others. This is especially important for deep beds, built-in planters, green-roof assemblies, water features, storage sheds, pergolas, and any project involving many people at once. Their guidance should account for local snow and wind conditions as well as the roof’s design. If an owner cannot provide that review, stay with a very small, lightweight project only if they explicitly authorize it-or do not garden there.

Garden elementWhat is easy to overlookSafer planning response
Deep raised bedWet medium across a large areaUse only with site-specific structural approval.
Large self-watering planterIts reservoir can hold substantial waterInclude a full reservoir in the load calculation.
Ceramic or concrete potHeavy before it is filledChoose lightweight, UV-stable containers where permitted.
Trellis with vinesWind force, not just pot weightUse a low, approved support or grow bush varieties.
Storage bench or gathering areaPeople and supplies add changing loadsKeep non-garden loads in the professional review.
How common rooftop choices change the load question

Protect the waterproofing, drainage, and roof surface #

Most low-slope roofs rely on a continuous waterproof membrane beneath the visible surface. A puncture, abrasion, failed seam, or blocked drain can allow water into insulation and building materials long before a ceiling stain appears. Never screw planter boxes into the roof, drive stakes through it, or use a knife directly on its surface. Dragging a gritty pot can also scuff a membrane. Follow the roofing manufacturer’s and building manager’s instructions about compatible protection layers, which may include approved pavers, walk pads, or pedestal systems.

Containers should sit on a permitted support that lifts them slightly above the roof surface, allowing water to move underneath and making leaks or trapped debris easier to spot. The support must spread the container’s weight as specified by the building professional; little feet are not automatically enough. Leave clear space around drains, and inspect them after windy weather, leaf drop, and heavy rain. Soil escaping from pots is not harmless: it can migrate into drain strainers and create the very blockage a roof is designed to avoid.

Design for wind, heat, and the water you can actually supply #

Rooftops are often warmer, brighter, and windier than the sidewalk below. Sun bouncing off pale walls, glass, metal, and paving can heat leaves and containers from more than one direction. Wind pulls moisture from foliage and potting mix, snaps tall stems, and can turn lightweight furniture into a hazard. Spend time on the roof at several points in the day before drawing a layout. Note direct sun hours, the direction of recurring wind, reflected glare, shade from neighboring buildings, and places where water pools after rain.

The best windbreak is not necessarily a solid wall. A permitted, professionally specified porous screen can reduce wind speed while allowing some air through; a solid panel may create powerful turbulence around its edges. Do not improvise with loose fabric, tall bamboo, or heavy lattice tied to a railing. On many roofs, the simpler answer is to place low planters away from exposed edges and grow compact varieties. Grouping containers reduces drying and makes irrigation easier, but do not cluster them so tightly that drains and roof inspections disappear.

A few movable containers

Best forFirst-time gardeners and roofs approved only for limited, removable use.

  • Lowest commitment
  • Easy to inspect beneath
  • Can move with changing shade
  • Dries quickly
  • Limited root room
  • Still needs wind security

Lightweight trough garden

Best forA stable, accessible roof with confirmed distributed-load guidance.

  • More growing space
  • Efficient for greens and herbs
  • Neater irrigation layout
  • Harder to rearrange
  • Needs careful support detail
  • More material to carry up

Engineered green roof or deep beds

Best forMajor renovations with professional design and building approval.

  • Can create substantial planted area
  • Potentially integrates with roof design
  • Durable when correctly built
  • Not a DIY container project
  • Requires structural and waterproofing coordination
  • Higher installation and maintenance commitment

Choose a garden scale that matches the roof approval

Build a small first-season garden that you can inspect #

Once approval, loading guidance, and roof-protection details are in place, start smaller than the available space. Choose containers with drainage holes and a broad, stable base. Food-grade plastic, fiberglass, and fabric grow bags are lighter than masonry or glazed ceramic, although fabric bags dry rapidly in wind. Use a quality container growing mix rather than soil dug from a yard. Garden soil compacts in pots, drains poorly, and weighs more than a purpose-made mix. Save every product label and take photographs of the original layout for the building’s records.

Mark the no-go zones

With the approved roof plan in hand, mark drains, hatches, service routes, edges, and mechanical equipment access. Keep those areas open before any container arrives.

Position approved protective supports

Install only the pads, pavers, feet, or support system accepted by the roof owner and roofing guidance. Check that each support is stable and does not trap water.

Set empty containers in place

Arrange them low and away from exposed edges. Confirm that doors open, walkways remain clear, and a person can reach every side without stepping on the membrane.

Add growing mix in manageable loads

Carry material up in small bags or buckets, then fill containers in place. Do not heap unused bags, empty pots, or tools in one corner of the roof.

Plant, label, and water slowly

Plant at the same depth as the nursery pot, label varieties and dates, and water until the mix is evenly moist and drains freely. Check the roof drain afterward.

Inspect after the first weather event

After a heavy rain or strong wind, look for shifting containers, escaping mix, standing water, clogged strainers, damaged foliage, and any surface abrasion.

Choose crops that suit a container, not a fantasy garden #

Match plants to the light you observed, not the amount of sun promised by a seed packet. Leafy greens, parsley, cilantro, chives, mint in its own pot, and many salad herbs can work with less direct sun than fruiting crops. Tomatoes, peppers, cucumbers, beans, and squash generally need strong sun and more root volume; on a breezy roof, choose compact or bush varieties rather than varieties bred to climb high. Start with plants you will harvest frequently. A pot of cut-and-come-again lettuce is more instructive than a neglected collection of novelty seeds.

ConditionGood candidatesWhat to watch
Four to six hours of sunLeaf lettuce, arugula, parsley, chivesWarm spells can make greens bolt quickly.
Full sun with regular wateringBasil, compact tomatoes, peppers, bush beansFruit crops need larger pots and consistent moisture.
Windy but approved low setupThyme, oregano, chives, compact leafy greensAvoid tall supports and top-heavy plants.
Part-day shadeMint in a separate pot, parsley, leafy greensSlow growth is normal in deep shade.
Very hot reflected surfacesRosemary, thyme, oregano, peppersContainers can still overheat and dry out.
Practical first choices for common rooftop conditions

Plant height is a structural and wind decision as much as a gardening decision. A tomato cage, arch, or cucumber trellis catches moving air like a sail. If supports are permitted, use only a low, stable system sized for the container and the crop, and inspect ties often. Never rely on a railing as an anchor. Skip corn, sprawling squash, large shrubs, and trees for a first roof garden: they demand space, deep root runs, or heavy containers, and they make access and load management harder.

Maintain the roof as carefully as the plants #

Container mix can look dry at the surface while remaining moist below, or look dark after rain while the root zone has dried in wind. Check with a finger a short distance into the mix before watering, and water slowly enough for the whole root zone to moisten. A basic watering can is often safer than an improvised long hose on a shared roof. If an approved hose connection or drip system is available, make sure it has proper backflow protection where required, is secured against trips, and is shut off before freezing weather.

Make roof checks routine rather than dramatic. After storms, look at every container, support, and drain. In hot weather, visit early enough to water before plants wilt severely and again later if conditions are extreme. Sweep escaped leaves and mix away from drains, remove fallen fruit, and keep tools indoors rather than stored against a parapet. At the end of the season, remove annual plants and assess whether containers can remain under the building’s winter rules. Freezing water can crack pots and alter drainage, while winter winds test anything left unsecured.

  • Weekly: check moisture, container stability, foliage pests, ties, and the area around each drain.
  • After high wind or heavy rain: confirm nothing shifted, no growing mix escaped, and drainage is free.
  • Monthly: inspect supports and contact points for grit, abrasion, trapped water, or signs of membrane damage.
  • Before travel: arrange a named caretaker, give them access instructions, and explain the roof’s no-go areas.
  • At season’s end: clear dead material, clean containers, and ask the building manager whether any winter removal is required.

Start with an approved sketch, then let one season teach you #

Your next useful action is to make a simple measured sketch: roof entry, drains, fixed equipment, required clear paths, approved planting zone, water source, and the proposed footprint of each container. Send that sketch with container dimensions, empty and fully watered weights where available, and support details to the person approving the project. Their response will tell you whether you have a garden plan or merely a wish list. It is much easier to revise a drawing than to relocate full planters on a finished roof.

Mastery here looks quiet. Your containers stay where you put them, drains remain visible and clear, the roof surface is protected, and you know how quickly each pot dries in a July breeze. You harvest what the site reliably supports and add capacity only after the building and your routine have proved it workable. A roof garden does not need to be enormous to feel generous. A well-managed cluster of herbs and vegetables can make a high, hard surface useful without asking it to become something it was never built to be.

Take this with you

Key takeaways

  • Ask for written permission, roof-system information, and site-specific load guidance before purchasing soil or containers.
  • Use access routes, drains, hatches, and service clearances to draw the garden’s boundaries before deciding its size.
  • Choose lightweight, drainable containers on approved protective supports; never pierce or drag across the roof membrane.
  • Let wind, reflected heat, and watering access determine your crop list, with compact varieties favored over tall, trellised plants.
  • Begin with a small, removable garden and expand only after a full season of safe, routine maintenance.

Questions readers also ask

Can I put a garden on an apartment building roof if I own my unit?

Owning a unit does not necessarily mean owning or controlling the roof. In many condominium and co-op buildings, the roof is a common element managed by an association or board. Review the governing documents and get written approval from the responsible party. They may also require a structural review, insurance confirmation, a roof-protection method, and rules for access and maintenance.

Can I use regular soil from a yard in rooftop containers?

It is usually a poor choice. Yard soil tends to compact in containers, reducing the air spaces roots need and making water drainage erratic. It is also heavier than a quality container growing mix, which matters especially on a roof. Use a container-specific mix for approved planters, and include its wet weight in the project information supplied to the building professional.

Do rooftop gardens need special irrigation?

They need a dependable watering plan, not necessarily a complex system. Hand watering works for a small garden when water access is close and safe. For a larger approved installation, a properly designed drip system may save time and reduce splashing, but it must meet building rules, avoid trip hazards, and be protected from leaks and freezing. Never leave an unattended hose running on a roof.

What should I do if water pools near a rooftop planter?

Move away from the area if doing so is safe, and do not assume the planter is the only cause. Keep the drain route clear of loose leaves and growing mix without poking or altering the drain assembly. Report persistent ponding, a blocked drain, or any apparent damage to the building manager or roofing professional promptly. Do not lift or drag heavy full containers without an approved plan.

Can I compost on a rooftop?

Only if the building specifically permits it and you can manage it without attracting pests, leaking liquid, or adding an unreviewed concentrated load. Open compost piles are rarely a good fit for shared roofs. A small sealed collection container, emptied into an approved municipal or community compost stream, is usually simpler. Keep any container away from drains, doors, and service routes.

How do I keep rooftop plants from blowing over?

Choose broad, low containers and compact plant varieties first; prevention is better than trying to anchor a top-heavy pot later. Place containers within the approved garden zone, away from exposed edges, and use only building-approved supports or wind protection. Do not tie planters to railings or fasten hardware through roofing. After every major wind event, inspect the setup before using the roof again.

rooftop gardeningurban gardeningedible gardenscontainer gardeningapartment living

How we made this. Every piece in the archive is researched and written by the editorial desk, then checked against our editorial standards. We do not publish medical, legal or financial advice. Spotted something we got wrong? Tell us, we correct in public.